Turkey Taco Casserole on the Grill – No Heating up that Kitchen!!!

Tags

, , , , , , , ,

Here in inland Northern California, our summers are pretty warm. We’ve had a series of days over 100 degrees, so I’ve been experimenting with more and more cooking on the grill. I’m trying to do anything I can to not heat up my house! This dish did the trick!!!

My experience cooking over an open fire when camping had scared me off from using my pans on the BBQ. BUT the gas grill does not cake your pans with soot the way an open fire does, so I’ve been using my cast iron skills on the grill more. I do have to admit, I’m not ready to put my Le Creuset pans on the grill!

So this casserole was cooked from beginning to end on our gas grill. The other great part about this dish is that most of the prep can be done ahead of time and stuck in the fridge for when you’re ready to cook. I love me some early dinner prep!!! Not to mention, it’s one of those all in one dishes! I didn’t make any other sides to go with it. It stood alone!

Turkey Taco Casserole

Makes 4-6 servings

1 pound ground turkey

2 tbsp oil (avocado or vegetable)

1 – 14 oz can black beans, drained and rinsed

1/2 cup diced green onions

1/2 cup diced cilantro

1 small can sliced black olives

1 diced fresh jalapeño (if you want less spice, remove the seeds and ribs)

1 small can diced green chiles

1 1/2 cups diced tomatoes (I used fresh, but you could use canned)

1/2 cup salsa

1 tbsp Tapatio hot sauce (optional)

1/2 tsp cumin

1/2 tsp paprika (I used hot, smoked paprika. We love our spice!)

1/2 tsp chili powder

Salt and pepper

1 cup crushed tortilla chips

1 1/2 cups grated pepper jack cheese (cheddar or plain jack would be good too.)

Our gas grill has 3 burner strips. I started by putting the 2 tbsp oil in my large cast iron skillet and then the ground turkey. I browned this over two of the burner strips. While that was cooking or even before, I mixed the next 12 ingredients (everything except tortilla chips and cheese) in a bowl and set aside or stick in the fridge if prepping ahead.

Once turkey is lightly browned, add the bowl of other ingredients and stir well until mixed. Sprinkle crushed tortilla chips over the entire top of casserole and then sprinkle grated cheese over that.

I turned all but one burner off and moved the skillet to the cooler side of the grill away from the burner that was on. I closed the grill and tried to maintain a temp of about 350 in the grill. I cooked for 40 minutes, turning it about 1/2 way through, so both sides of the skillet would cook evenly. You can check with a spoon to see that the center of the skillet is nice and hot.

I hope you enjoy and stay cool!!!
Southwestern Chicken Casserole – Pure Comfort Food With a Little Heat!

Tags

, , , , ,

I made this recipe on the fly the other night and it was a complete hit with my husband and I! It had a ton of flavor with just the right amount of heat. The creamy sauce prevented it from being overly spicy. And this was a great way to use the leftover chicken I had from roasting a whole chicken earlier in the week. A store bought rotisserie chicken could also be used.

Southwestern Chicken Casserole

4 servings

8 oz. penne pasta

1 tbsp oil

1/2 lb. shredded cooked chicken

1/2 onion, diced

1/2 red bell pepper, diced

1/2 large jalapeño, finely diced

1/2 cup frozen corn

1 can cream of chicken soup

1/2 cup chicken broth

1/3 cup sour cream

1 4 oz can diced green chilies

1 14 oz can black beans, drained and rinsed

1 cup pepper jack cheese, shredded and divided

1 tsp chili powder

1/2 tsp paprika

1/2 tsp hot Hungarian paprika

1/2 tsp garlic salt

Salt and Pepper

Preheat oven to 350 degrees.

Boil pasta in salted water for 8 minutes. It will continue to cook when you bake the casserole. Drain maintaining pasta water for possible use.

In an oven safe frying pan or braiser, add oil and over medium heat sauté the onions, bell pepper, jalapeño and corn until softened. Stir in cream of chicken soup, broth and sour cream. Stir until thoroughly mixed. Stir in chicken, green chiles, black beans, 1/2 cup of pepper jack cheese and seasonings. Taste and add salt and pepper to taste. Stir in drained pasta. If sauce is too thick, add some of your reserved pasta water. Mix until pasta is incorporated. Top with remaining 1/2 cup pepper jack cheese. Bake for 30 minutes.

Enjoy!

Corned Beef and Cabbage – St. Patty Day Classic

Tags

, , ,

Here’s a link to our family’s St. Patrick’s day favorite! We mix it up and go with the red cabbage though. I guess it’s a nod to our German roots! Enjoy!

Corned Beef and Cabbage – Better Late Than Never!!!

Leftover Stuffing Strata – A Great Use for That Leftover Thanksgiving Stuffing!!!

Tags

, , , , , , , ,

Leftover Stuffing Strata

I had a bunch of my Southwestern Cornbread and Chorizo Stuffing leftover from Thanksgiving. We had enjoyed some of it as is and I was ready to try something new. I had seen a different strata recipe on one of my favorite cooking shows (Food Network’s The Kitchen) and a lightbulb went off in my head! Why not use my leftover stuffing (or dressing!) as the bread component of a strata?!? This would be an awesome brunch dish for Black Friday!

I think this would work well regardless of the type of stuffing you made. You could change the flavor profile by changing up the veggies and cheese you use. I went with the Southwestern theme of my original stuffing recipe and this strata was fabulous!!! I have tried to write the recipe in a way that will help you work with what you have.

Enjoy!

Leftover Stuffing Strata

2 1/2 – 3 cups of leftover stuffing/dressing

4 small green tomatoes, diced (You could change this up to tomatillos, red bell pepper, or even leftover green beans!)

1/2 white onion, diced (This could also be red onion, green onions or leeks)

5 -6 eggs

1/2 cup half and half

1 – 1/2 cups grated cheese (I used pepper jack. If you had a more traditional stuffing recipe, jack, cheddar or even grayer cheese would be a great add)

Dash hot sauce

Paprika or hot Hungarian Paprika

Preheat oven to 350 degrees. In a skillet, cook veggie of your choice (I used green tomatoes) and onions in a tablespoon or two of oil or butter until softened. Drop spoonfuls of leftover stuffing/dressing into a greased casserole dish, leaving some space between spoonfuls. Spoon veggies from skillet over stuffing. Do not pack down. You want to leave room for the egg mixture to seep down into mixture.

In a mixing bowl, crack eggs and beat lightly. Add half and half, a dash or two of hot sauce (optional), grated cheese and a bit of salt and pepper. Mix together and then pour over stuffing and veggies in casserole.

Sprinkle a little paprika over the top of the casserole. Cover dish with lid or foil and bake for 30 minutes. Remove lid and bake for an additional 10 minutes.

Makes 4-6 servings.

Olive Garden Copycat Breadsticks

Tags

, , , , , , , , ,

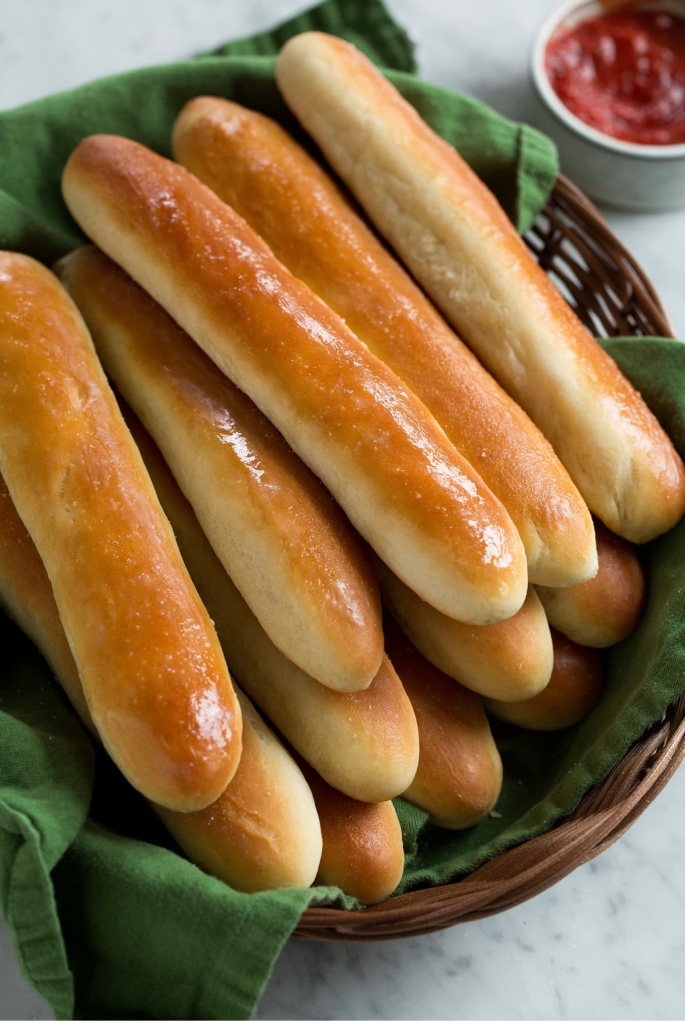
So I cannot take credit for this recipe, I found it at Cooking Classy. I made these breadsticks yesterday for my mother-in-law’s birthday. She is a huge Olive Garden fan, but with the COVID situation we decided to have a small luncheon at home. My daughter challenged me to find a recipe and try to recreate the Olive Garden breadsticks instead of baking my usual bread loaves. This recipe fit the bill!!! My MIL said the breadsticks were even better than Olive Garden’s!!!

I did find that when I measured out 2 oz balls to form into the breadsticks, I actually got 14 breadsticks out of this recipe.

I also chose to make these a day ahead and par-baked them for 6 minutes and then stored them in a ziplock back over night. Then the day of I baked them an additional 7-8 minutes until golden brown and then brushed with the butter and seasoning. You could definitely freeze these too.

Delicious!!! I will definitely make these again! Everyone loved them!

Servings: 12-14

Prep 25 minutes

Cook 11 minutes

Resting 2 hours 30 minutes

Ready in: 3 hours 6 minutes

Ingredients

  • 1 cup + 2 Tbsp warm water(110 – 115 degrees)
  • 1 1/4 tsp active dry yeast
  • 2 Tbsp granulated sugar,divided
  • 3 – 3 1/2 cups all-purpose flour
  • 1 3/4 tsp salt
  • 3 Tbsp vegetable oil or olive oil

Topping

  • 2 Tbsp butter
  • 1/4 tsp salt (or to taste)
  • 1/4 tsp garlic powder

Instructions

1. In the bowl of an electric stand mixer whisk together warm water, yeast and 1/2 tsp granulated sugar until yeast has dissolved. Allow to rest 10 minutes.

2. Add in remaining 1 Tbsp + 2 1/2 tsp granulated sugar, 1 1/2 cups flour, 1 3/4 tsp salt and vegetable oil, then fit mixer with paddle attachment and blend mixture until well combine.

3. Switch mixer to dough hook attachment, add in remaining 1 1/2 cups flour and knead mixture on low speed, adding up to 1/4 cup additional flour as needed, and knead until dough is smooth and elastic.

4. Transfer dough to a large buttered mixing bowl, cover with plastic wrap and allow to rest in a warm place free from draft until double, about 1 1/2 hours.

5. Punch risen dough down, divide into 12 equal portions (2 ounces each by weight), keep them covered with plastic wrap as you work. Roll each piece into a 9 inch rope on a lightly floured surface, then transfer to two parchment paper lined baking sheets. Cover and let rise 1 hour.

6. Preheat oven to 425 during the last 10 minutes of rising. Bake in preheated oven 11 – 13 minutes until golden.

7. Meanwhile, in a small bowl whisk together 1/4 tsp salt and garlic powder.

8. Remove breadsticks from oven and run a stick of butter over hot breadsticks (using 2 Tbsp, or brush with melted butter) and immediately sprinkle with garlic salt mixture.

Oregano Chicken with Fresh Tomato & Balsamic Sauce – DELICIOUS and low fat!!!

Tags

, , , , , , , , , , ,

Oregano Chicken with Fresh Tomato & Balsamic Sauce

I think chicken is my favorite protein to cook with! It’s so versatile, healthy and just delicious! This dish was even more delicious than what I expected going in. I want to make it again, so I told myself I definitely needed to blog this recipe. Because yes, I do cook from my own blog! LOL! They are recipes that I loved enough to take the time to document and photograph, so in my book that means they’re worth revisiting!

Oregano Chicken with Fresh Tomato and Balsamic Sauce

Serves 4 people

Cooking time: 45 minutes

4 chicken thighs (I used bone-in with skin removed, as they add more flavor, but you could do boneless and reduce cooking time)

2 tsp dried oregano

1/2 tsp Kosher salt

2 tsp avocado or olive oil

2 cloves garlic, pressed or minced

2 shallots, thinly sliced

2 tbsp balsamic vinegar

2 cups cherry tomatoes, halved (I buy the multicolored heirloom cherry tomatoes. Delicious!!!)

1/4 cup chicken broth

1/4 cup white wine (Only use wine you would drink. If it’s not good enough for drinking, it’s not good enough for cooking!)

2 tsp capers, drained

2 tbsp lemon juice

Add oil to non-stick frying pan and heat over medium-high heat. Season one side of chicken with 1/2 of salt and rosemary and add to pan, seasoned side down. Season other side of chicken. Brown chicken on each side for about 2-3 minutes per side. When browned but not cooked all the way through, remove to plate and stick in a 350 oven while you continue cooking sauce.

Turn the heat on your frying pan down to medium-low and add garlic and shallots (You don’t want to burn your garlic! It turns bitter, ruins your dish and that pan is done!) stir until shallots are softened. Add vinegar and cook until mostly evaporated, scrapping the bottom of the pan while it cooks to get the yummy stuff off the bottom and into your sauce.

Stir in tomato halves, capers, chicken broth, wine, lemon juice and a little more salt and pepper to taste. Stir and simmer until well mixed. Add your chicken back in to the plan and turn to coat with sauce. Cover the pan and simmer on low for 15-20 minutes, turning chicken once, until chicken registers at least 165 degrees with a meat thermometer.

This is great served over rice! The sauce is fabulous, so you want something to soak up that goodness!!! I paired it with some artichokes cooked with lemon and garlic. So good!!!

I hope you enjoy!!!

My No BS Weight Loss Journey

Tags

, , ,

So I know my focus is a food blog, but I thought I would share a little about my most recent project. Me! As you can imagine, loving to eat and cook as I do can make weight management challenging. Challenging, but not impossible! In the last 1 1/2 years I have been working to lose weight and I am currently 84 pounds down. That’s just the physical weight! I’d say I’ve lost about a ton of mental weight!

Like many, my weight crept up with age and then life hit me with some emotional challenges and that helped accelerate my gain. After a traumatic vacation to Orlando, where I couldn’t keep up with my family and couldn’t fit on some rides, I made the decision that I needed to regain control. Luckily, I stumbled upon a wonderful podcast, “Losing 100 Pounds With Corinne Crabtree”! I started at episode #1 and this southern lady with a potty mouth made sense!!! We can lose weight with 4 simple basic behaviors; Write a plan for your food every day and stick to it, eat between hungry and satisfied, drink 64 oz of water, and get 7-9 hours of sleep. That’s it!!! No diet, you ask? Nope! No exercise plan? Nope! Not necessary if you follow her basics!

If you’ve read my blog, you know this girl loves tasty food! All the food! The carbs! The meat! The sweets! Appetizers! Baked goods! All of it!!! I finally found a plan that suited my food lovin’ lifestyle!

In addition to the four basics I described, Corinne also focuses on doing the thought work that will forever change your relationship with food and teach you how to manage your feelings and urges. This is REALLY where the rubber meets the road!!! Here is where her program is different than any other program, because the things you learn will not only help you lose your weight, but keep it off for good. I’m telling you! This program is like no other!!! It will not only impact your weight, but so many other areas of your life!

So if you’re looking to lose some weight, I highly suggest you check out the free podcast. Corinne also has free training available at her website. Anyone is welcome to check out the free podcast, but her training is intended for women. If you’re interested in going deeper and having access to much more amazing resources, she does have a paid membership available only to women.

I get no tangible benefit from sharing this information. Really!!! Only the joy of helping others change their lives and get to a healthier you! If you have questions, please feel free to drop me a comment.

Be healthy ya’ll!!!

Zucchini Pizzas – A Healthier Version of a Family Favorite!

Tags

, , , , , ,

For the last year, I have been on a weight loss journey. I’m down 80 pounds so far and still going strong! One of the things that has helped me, is to give some of our favorite foods a health upgrade. And who doesn’t love pizza?!? So last night I decided to level up the pizza and make a healthier version that tasted great and totally answered my pizza craving! The zucchini doesn’t have a strong flavor, so it really was just a healthy vessel for the yummy pizza toppings.

Now I guess you could make this on lengthwise slices of normal size zucchini, but this is the PERFECT recipe for those ginormous, mutant zucchini’s we have all found hiding in our gardens!

How did I do it?

1. Slice zucchini about 1/4 inch thick.

2. Lay paper towels out on counter or on cookie sheets

3. Lay down zucchini slices and sprinkle lightly with kosher salt. Flip and salt other side.

4. Let sit for an hour or so, periodically patting dry with additional paper towels. Flip over once in a while.

5. Preheat oven to 375. Put zucchini on a baking sheet and bake for 20 minutes.

6. Remove zucchini from oven and top with favorite sauce and pizza toppings. I used my homemade red sauce, grated motzarella, pepperoni, more motzarella, and black olives. Bake for an additional 15-20 minutes until cheese is melty.

Enjoy!

Spicy Chicken Sweet Potato Chili – Hearty and Healthy!!!

Tags

, , , , , , , ,

I’m always looking for ways to sneak additional vegetables into our meals. I happened to have a sweet potato on hand and thought it would be a good add to spicy chili. The sweetness of the potato really balances out this dish! It was an incredibly flavorful! Very hearty and healthy too! You could substitute ground turkey for the chicken or leave the meat altogether for a delicious vegetarian or vegan dish (If you left out the sour cream).

Spicy Chicken Sweet Potato Chili

Makes 6-8 servings

1-2 tbsp avocado or olive oil

1/2 diced sweet yellow onion

3 cloves garlic, pressed or minced

2 cans Rotel tomatoes (I used one can hot and one can chipotle Rotel)

1 – 8 oz can tomato sauce

1/2 cup water (rinsed Rotel can and dumped in)

1 pound chopped rotisserie chicken (or 1 pound ground turkey, browned)

1 can kidney beans, drained and rinsed

1 sweet potato, peeled and diced

1/4 cup roasted red peppers, diced

3/4 tsp cumin

3/4 tsp Hungarian Paprika

1 tablespoon chili powder

1/2 cup sour cream

Kosher salt and fresh ground pepper

Add oil to Dutch oven or other large pot over medium heat. Add onion and sauté until soften, add garlic and sauté another couple of minute until fragrant. Add remaining ingredients and set to low and simmer for 1-2 hours. You could also sauté the onion and garlic and then throw everything in the slow cooker for 4-6 hours on low. Serve with tortilla chips, sliced green onions, chopped avocado or any other toppings you like on your chili.

Enjoy!!!

Dill Pickle Popcorn – A Yummy Snack!!!

Tags

, , , , ,

So my daughter LOVES dill pickles!!! I even bought her a box of pickle juice pops for Christmas one year. LOL! She and her husband were hosting the Super Bowl party and I decided to try my hand at making dill pickle popcorn to bring. Everyone loved it!!!! We had two separate viewing rooms and people kept stealing the bowl back and forth, so I think it was a hit!!! If you like salt and vinegar chips, you will love this flavor profile.

Dill Pickle Popcorn

  • 1 tablespoon ground coriander
  • 1 tablespoon kosher salt
  • 1/2 teaspoon ground mustard
  • 1/2 teaspoon garlic powder
  • 1/2 teaspoon onion powder
  • 1/2 teaspoon citric acid (I bought this online through Amazon. This gives you the sour vinegar taste!)
  • 1 1/2 teaspoon dried dill
  • 1 1/2 – 2 cups crushed Lays Dill Pickle potato chips
  • 5 quarts of buttered popcorn

Mix together all the seasonings in a small bowl. Then in a large bowl mix popcorn, potato chips and seasoning mix. Enjoy!!!